
How To Contour The Face In 5 Easy Steps
Face contouring has been around for ages. It’s something that makeup artists have been known for, adding depth and dimension to facial features and bone structure to celebrities alike. You might have even tried making your nose look narrower or cheekbones higher with little success. It might sound intimidating to do at home, but with several tips and tricks, you can soon look like you were born with perfect looking features.
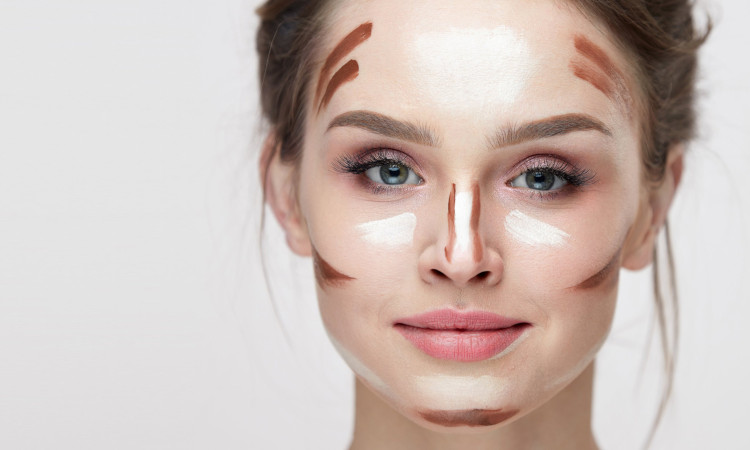
What Is Face Contouring?
The purpose of contouring is to create an illusion of recession so that certain features will stand out. With contouring, darker shades are applied with a technique that makes it look like the area casts a shadow making the part not darkened or shaded stand out. Common areas that are contoured are around the nose, cheek, forehead, and jawline.
The creamy contouring concealer can correct dark spots, acne scars, and blackheads on your skin to reveal a beautiful, perfect finish. You will need to has multicolor of concealer for each spot on your skin.
Steps For Contouring
- Choose The Right Product
Selecting the right shade is an important step with contouring. You want to aim for subtle, not dramatic. Know the correct shade for your skin tone and go with one or two shade darker for the contour. You will also want to avoid products with shimmer, which is commonly used for highlighting, the opposite of contouring. A contour kit like Glo Skin Beauty Contour Kit usually has shades for contouring and highlighting. - Map Your Face
If you have a larger forehead and want to minimize the appearance, trace the temples straight into the hairline. To enhance the cheekbones, place the pigment right above where you feel it dip underneath the bones. For a slimmer nose, add parallel lines of the darker shade on either side of the nose. As for a more sculpted jawline, start just underneath the bottom of your ear to just before your chin.
- Blend
Use a blending brush like Rhonda Allison Illuma Colour Brush and tap in small circular motions until there are no visible lines from mapping the face. Start with a lighter application and build up for the desired intensity. - Use A Highlighter
To balance out the look, place a lighter shade or a shimmery highlighter on areas underneath the eyes and just right above the cheekbones. - Apply Finishing Powder
Finish up the look by dusting the face with a translucent loose powder.
Recent Posts
-

The Power of Exosomes in Skincare
Exosomes in Skin Care: The Future of Exosome and Regenerative Medicine in Skin Science Skincare inn …Oct 17th 2025 -
Steps for a Skincare Routine
6 Steps to a Proper Skin Care Routine: Your Esthetician-Approved Guide to The Best Skin If you've ev …Aug 11th 2025 -
Treatment of Hyperpigmentation
How to Treat the Appearance of Hyperpigmentation This Summer: Your Complete Guide Summer sun is wond …Jul 17th 2025


